
Opening Doors Without Opening Ports: A HomeLab Guide to Cloudflare Tunnel

I spent an evening last year trying to expose a single service running on my home server to the internet. The plan was the one everybody starts with: open a port on the router, point DNS at it, go to bed feeling clever.
What actually happened: I logged into my router's admin panel, went three levels deep into nested menus labelled in a language I don't speak, found the port forwarding section — buried under "Advanced," which was itself hidden behind "Expert Mode," because nothing says expert like a menu you have to unlock — saved the rule, and then spent twenty minutes wondering why the service still wasn't reachable from outside my network.
My ISP blocks inbound 8080. Of course it does. It also blocks 80 and 443, which I discovered fifteen minutes later, in the order most likely to maximise irritation.
I closed the router tab, went to bed, and came back the next morning with a completely different idea: stop trying to let the internet in. Have my server reach out instead.
That's Cloudflare Tunnel. No port forwarding. No router configuration. No home IP address sitting in a DNS record where anyone with dig and bad intentions can find it. Here's how it works, and how to set it up without walking into the same walls I did.
What Is Cloudflare Tunnel?
Cloudflare Tunnel — driven by a small daemon called cloudflared — creates an outbound encrypted connection from your machine to Cloudflare's edge network, and then keeps it open. That direction is the entire trick. Instead of configuring your router to accept connections from strangers, your machine dials out, and Cloudflare sends visitor traffic back down the pipe that's already established.
An analogy that survives contact with reality:
Port forwarding is cutting a hole in your front door and telling the neighbourhood that deliveries go through it. You can put a good lock on the hole, but it's a hole, it's on your property, and everyone can see it. Port scanners find it within hours — I've watched the logs, and "hours" is generous.
Cloudflare Tunnel is having no door at all, and instead sending a courier out to a depot. Your machine initiates the connection outward. Your home IP never appears in public DNS, nothing needs to be forwarded, and the router stays exactly as your ISP shipped it.
The traffic path looks like this:
Visitor → Cloudflare edge (public, anycast) → QUIC connection → cloudflared → your local serviceOne detail worth getting right, because a lot of write-ups fumble it: that connection uses QUIC over UDP 443 by default, falling back to HTTP/2 if UDP is blocked on your network. It is not WARP — WARP is Cloudflare's client-side VPN, a different product that shows up in tunnel config only if you're routing whole private subnets. For publishing web services, you're on QUIC, and you can pin it explicitly with --protocol quic if your firewall does something creative with UDP.
If this whole shape feels familiar, it should — I used Twingate to reach my home Ollama box from the cloud on the same principle. The difference: Twingate is private access for people you invite, and Tunnel is public access for anyone with the URL. Same refusal to open ports, opposite audiences.
Architecture Overview
Here's what we're actually building. We're not just running cloudflared and stopping there — there's an nginx reverse proxy sitting behind it. That gives us one place to do hostname routing, one place to fix headers, and one tunnel serving as many services as we want to add later.
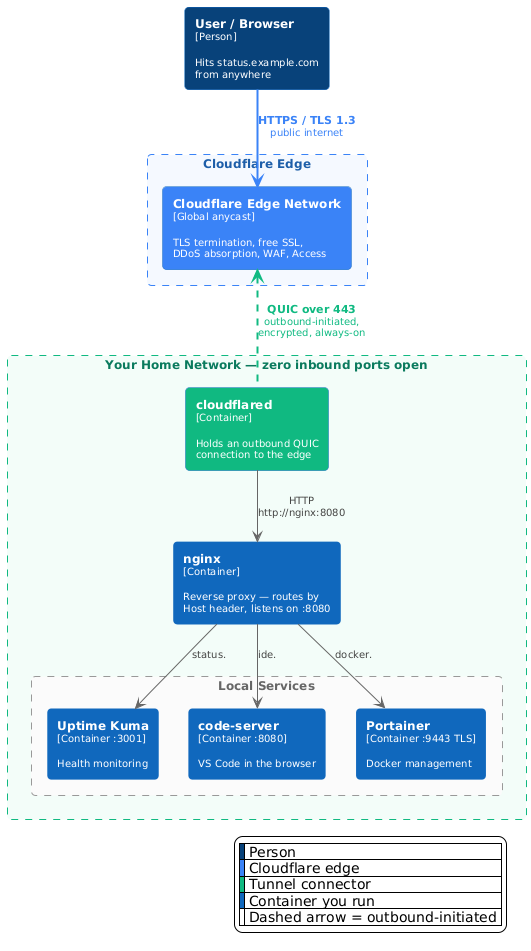
The nginx layer looks like extra moving parts, and for exactly one service it is. It earns its keep the moment you add a second one: instead of managing a growing list of routes in the Cloudflare dashboard, you point every hostname at nginx and let nginx sort it out locally, in a file you can diff and version-control. One tunnel, many services, one config to reason about.
Prerequisites
- A Cloudflare account — the free tier covers this comfortably
- A domain — registered with Cloudflare, or registered elsewhere and using Cloudflare's nameservers
- Docker and Docker Compose — on any box that stays powered on. A Raspberry Pi 5 is plenty; mine ran on one for months before it got promoted
- A terminal and mild patience
Not on the list: a static IP, a public IP, router access, dynamic DNS, or a support call that begins with "have you tried restarting the router" and ends forty minutes later with you restarting the router.
Step 1: Getting a Domain
Tunnel needs a domain whose DNS lives at Cloudflare. Two ways to get there.
Option A: Register with Cloudflare
Cloudflare Registrar sells at cost — wholesale registry price plus the ICANN fee, no markup, no first-year bait pricing, no renewal surprise. A .com lands around $10.44/year, and it renews at $10.44/year, which is the part that matters. WHOIS privacy and DNSSEC are included rather than upsold.
The catch, and it's a real one: Cloudflare Registrar requires you to use Cloudflare's nameservers. That's fine here — we want them anyway — but if you like keeping DNS somewhere else, register somewhere else.
Option B: Keep your registrar, move your DNS
Already own something from Namecheap, GoDaddy, or whoever? Add the domain to Cloudflare, and it'll hand you two nameservers. Paste those into your registrar's nameserver settings, replacing what's there. Propagation is usually minutes, occasionally hours, theoretically 48 of them.
Once Cloudflare is answering for your domain, everything below works identically.
Step 2: Creating the Tunnel
There are two flavours of tunnel and picking the wrong one is the single most common way to lose an evening, so let's be precise:
- Remotely-managed — created in the dashboard. Its routing config lives at Cloudflare, and the connector authenticates with a token. This is what we're using.
- Locally-managed — created with
cloudflared tunnel create. It gets a<UUID>.jsoncredentials file and a localconfig.ymlholding the ingress rules.
They are not interchangeable, and the failure mode is nasty because in a compose file the two secrets look like siblings. A tunnel token is a long base64 blob; a credentials file is JSON. Feed one to the flag expecting the other and you get a container in a restart loop, emitting an authentication error that manages to be simultaneously verbose and completely silent on which of the two things you got wrong. Half the "Cloudflare Tunnel doesn't work" threads on the internet are two people confidently helping each other with different tunnel types.
Create the tunnel: Cloudflare dashboard → Zero Trust → Networks → Tunnels → Create a tunnel → Cloudflared. Name it homelab. Cloudflare will immediately show you installation snippets for various platforms with a very long token embedded in them.
Copy that token. That's the whole secret. Drop it into a .env file next to your compose file:
# .env — never commit this
TUNNEL_TOKEN=eyJhIjoiYzE5...the-rest-of-a-very-long-string
And then, immediately, before you get distracted and before this file quietly rides along in your next commit to a public repository where a bot will find it in under a minute — GitHub's secret scanners are extremely good at their job, and so is everyone else watching:
echo ".env" >> .gitignore
chmod 600 .env
Anyone holding that token can run a connector for your tunnel. Treat it like a password, because functionally it is one. The upside of the remotely-managed model is that if it leaks you can delete the tunnel in the dashboard and rebuild it in about ninety seconds — there's no irreplaceable key file to lose.
Step 3: Nginx as the Traffic Cop
Before connecting anything to the internet, let's set up the layer that decides where requests go. cloudflared will hand everything to nginx on port 8080, and nginx routes by hostname.
What this buys us:
- One entry point — the tunnel has exactly one route to maintain, forever
- Hostname routing —
status.example.comto Uptime Kuma,ide.example.comto VS Code, no path-prefix gymnastics - Header correction — the thing that decides whether your apps generate working links or send everyone to
http://redirect purgatory - A default deny — anything that doesn't match a known hostname gets nothing
This file goes in ./nginx/conf.d/default.conf, which we'll mount into /etc/nginx/conf.d/. That path matters: the stock nginx image already provides the outer http { } block and includes everything in conf.d. If you mount a bare server { } block over /etc/nginx/nginx.conf instead, nginx dies on startup complaining about a directive not being allowed there.
# ./nginx/conf.d/default.conf

# Uptime Kuma — status dashboard
server {
    listen 8080;
    server_name status.example.com;

    location / {
        proxy_pass http://uptime-kuma:3001;

        proxy_set_header Host              $host;
        proxy_set_header X-Real-IP         $remote_addr;
        proxy_set_header X-Forwarded-For   $proxy_add_x_forwarded_for;
        proxy_set_header X-Forwarded-Proto https;

        # Kuma streams live status over websockets
        proxy_http_version 1.1;
        proxy_set_header Upgrade    $http_upgrade;
        proxy_set_header Connection "upgrade";
    }
}

# anything that isn't a hostname we know about gets the door
server {
    listen 8080 default_server;
    server_name _;
    return 444;
}
Two things in there are load-bearing:
X-Forwarded-Proto https is hardcoded, not $scheme. Copy-paste configs use $scheme, which is correct when nginx itself terminates TLS. Here it isn't — Cloudflare did that at the edge, and the hop from cloudflared to nginx is plain HTTP. So $scheme evaluates to http, your app dutifully builds http:// URLs, Cloudflare bounces them to HTTPS, and the app rebuilds them as HTTP again. Congratulations: you have built a perpetual motion machine, and its only output is ERR_TOO_MANY_REDIRECTS. I have lost time to this on more than one project, in more than one year, and I would like it on record that I now check this first.
The websocket headers aren't optional. Uptime Kuma's entire UI is a live socket — without proxy_http_version 1.1 and the Upgrade/Connection pair, you get a beautiful dashboard that loads once and then never updates, showing you the state of the world at the moment you opened the tab.
Adding More Services Later
Each new service is another server block. Two that are worth showing, because both have a sharp edge:
# code-server — VS Code in the browser
server {
    listen 8080;
    server_name ide.example.com;

    location / {
        proxy_pass http://vscode-server:8080;

        proxy_set_header Host              $host;
        proxy_set_header X-Real-IP         $remote_addr;
        proxy_set_header X-Forwarded-For   $proxy_add_x_forwarded_for;
        proxy_set_header X-Forwarded-Proto https;

        proxy_http_version 1.1;
        proxy_set_header Upgrade    $http_upgrade;
        proxy_set_header Connection "upgrade";

        # an idle editor is still an open editor
        proxy_read_timeout 3600s;
    }
}

# Portainer — note the https:// upstream
server {
    listen 8080;
    server_name docker.example.com;

    location / {
        proxy_pass https://portainer:9443;
        proxy_ssl_verify off;

        proxy_set_header Host              $host;
        proxy_set_header X-Real-IP         $remote_addr;
        proxy_set_header X-Forwarded-For   $proxy_add_x_forwarded_for;
        proxy_set_header X-Forwarded-Proto https;

        proxy_http_version 1.1;
        proxy_set_header Upgrade    $http_upgrade;
        proxy_set_header Connection "upgrade";
    }
}
Portainer's upstream is https://. Port 9443 is its TLS listener, and aiming plain HTTP at it fails in a way that reads like a network problem rather than a protocol mismatch. The certificate is self-signed and the hop never leaves the Docker bridge, so proxy_ssl_verify off is the pragmatic answer.
code-server needs the long read timeout, or your editor disconnects every 60 seconds while you're reading code instead of typing it. The rest of that setup — running it in Docker, giving it access to the host's Docker socket, and the fun that follows — I wrote up separately in VS Code in the Browser.
One rule when you add these: don't add a server block for a container that doesn't exist yet. Nginx resolves upstream hostnames when it parses the config, so a proxy_pass pointing at a container you haven't started fails with host not found in upstream — and nginx refuses to start at all. Not the one bad route — the whole proxy, including the four services that were working perfectly five seconds ago and are now equally offline out of solidarity. Start the container first, then add its block, then docker compose restart nginx. In that order, ideally not at midnight.
Step 4: The Full Stack
Our example service is Uptime Kuma, the dashboard I use to watch every other container in the HomeLab. It's a good first thing to expose, because a monitoring dashboard you can only see from inside the network being monitored is a philosophical object rather than a useful one. When something falls over at 3am, you want to check it from your phone, in bed, without a VPN handshake standing between you and going back to sleep. Pair it with ntfy and it'll wake you up itself, which is either a feature or a mistake depending on the night.
Here's the whole stack — connector, proxy, service:
services:
  # Cloudflare Tunnel — outbound QUIC connection to the edge
  cloudflared:
    image: cloudflare/cloudflared:latest
    container_name: cloudflared
    restart: unless-stopped
    command: tunnel --no-autoupdate run
    environment:
      - TUNNEL_TOKEN=${TUNNEL_TOKEN}
    depends_on:
      - nginx
    networks:
      - homelab

  # Nginx — routes tunnel traffic to the right container by hostname
  nginx:
    image: nginx:alpine
    container_name: nginx-proxy
    restart: unless-stopped
    volumes:
      - ./nginx/conf.d:/etc/nginx/conf.d:ro
    depends_on:
      - uptime-kuma
    networks:
      - homelab

  # Uptime Kuma — the thing we're actually publishing
  uptime-kuma:
    image: louislam/uptime-kuma:2
    container_name: uptime-kuma
    restart: unless-stopped
    volumes:
      - ./uptime-kuma/data:/app/data
    networks:
      - homelab

networks:
  homelab:
    driver: bridge
Read that file again and notice what isn't in it: there is no ports: section anywhere. Nothing is published to the host, let alone to the network. The three containers talk to each other over the homelab bridge by container name, and the only thing crossing the boundary of the machine is the connection cloudflared opens on its way out. That absence is the whole point of the exercise.
Start it:
docker compose up -d
docker compose logs -f cloudflared
You're looking for Registered tunnel connection, ideally four of them — cloudflared opens redundant connections to multiple Cloudflare data centres so a single edge hiccup doesn't take you offline.
A note on uptime-kuma:2: v2 is the current stable line, and if you're moving an existing v1 install across, read the project's migration notes first — the database gets upgraded in place and rolling back afterwards is not a thing.
Step 5: Publishing Hostnames
The tunnel is up but connected to nothing. Now we tell Cloudflare which hostnames belong to it.
In the dashboard: Zero Trust → Networks → Tunnels → your tunnel → Edit → Public Hostnames → Add a public hostname.
For each service, three fields:
- Subdomain:
status - Domain:
example.com - Service:
HTTP→nginx:8080
That's the only hostname the stack above needs. As you add services, each one gets its own entry — and every single one of them points at the same nginx:8080, because nginx reads the Host header and takes it from there. That's the payoff for the extra container: this dashboard form is the last Cloudflare configuration you do per service.
The service address is nginx:8080, not localhost:8080, and this trips up nearly everyone once. Inside a container, localhost is that container. cloudflared resolves nginx through Docker's embedded DNS on the shared network, which is precisely why both containers are on homelab.
Cloudflare creates the DNS records for you as you add hostnames — proxied CNAMEs pointing at <tunnel-UUID>.cfargotunnel.com. You'll see them appear in the DNS tab, one per hostname, each individually removable. There's no wildcard involved: subdomains you haven't published simply don't resolve to your tunnel.
Checking It Works
The tunnel page should show Healthy with active connectors listed. Then visit https://status.example.com and you should get Uptime Kuma's setup screen, on a valid certificate you didn't have to request, renew, or think about.
If it doesn't work, the error page tells you where to look:
- 1033 — Cloudflare can't find the tunnel. The connector isn't running, or the hostname is attached to a different tunnel than the one your token belongs to.
- 502 / 1016 — the tunnel is fine, but cloudflared can't reach what you pointed it at. Usually
localhostinstead of the container name, a wrong port, or containers on different networks. - 521 / 522 — nginx is reachable but not answering. Check
docker compose logs nginx; a config typo means the container never came up at all.
Two commands cover most of it:
docker compose logs --tail 50 cloudflared
docker compose exec cloudflared wget -qO- http://nginx:8080 -S
The second one tests the hop the dashboard can't see for you. If that fails, the problem is entirely inside your Docker network and Cloudflare has nothing to do with it.
Step 6: Putting an Actual Lock On It
Right now anyone who guesses your hostname lands on your login page. That's the same security posture as port forwarding — better hidden, but the door still opens for anyone who knocks correctly. Uptime Kuma's password is now the only thing between the public internet and a dashboard listing every service you own, with helpful uptime graphs showing exactly when you're not paying attention.
We can do better, and it's free. Cloudflare Access puts an identity check at the edge — thousands of kilometres away, before the request is ever forwarded down your tunnel. Unauthenticated traffic doesn't get a 401 from your app. It doesn't reach your app. It doesn't reach your house.
Creating the Application
In the dashboard: Zero Trust → Access controls → Applications → Create new application → Self-hosted.
- Application domain:
status.example.com— the same hostname you published in Step 5 - Session duration: how long a successful login lasts. 24 hours is a reasonable HomeLab default; set it to a month and you've built a slightly slower version of no authentication
Then add a policy, because Access applications are deny by default — with no matching Allow policy, nobody gets in, including you, which is a design decision you will personally verify within about four minutes.
- Action: Allow
- Selector:
Emailsand your address, orEmails ending inand@yourdomain.comif you want to let the family in
Choosing How People Prove Who They Are
This is the part worth understanding, because Cloudflare gives you real second factors without asking you to run an identity provider in your spare room.
One-time PIN is the zero-setup option and it's enabled out of the box. The visitor types their email address, Cloudflare emails them a code, they paste it in, they're through. The PIN is valid for ten minutes and single-use — requesting a new one immediately invalidates the old one, which is a detail worth knowing before you request three in a row and start blaming your mail server. No identity provider, no OAuth app registration, no configuration. If the address isn't in your Allow policy, no code is ever sent.
SSO through a real identity provider is the better option if you already have one, and you do: Zero Trust → Integrations → Identity providers lets you wire up Google, GitHub, Microsoft Entra, Okta, or anything speaking generic OIDC/SAML. The elegant part is what you inherit. If your Google account is protected by an authenticator app, a passkey, or a hardware key, then so is your HomeLab dashboard — you didn't implement any of it, and you can't accidentally implement it badly. Your monitoring stack quietly acquires the phishing-resistant MFA of a company with a security team.
You can enable several at once and let people pick, which mostly means you use SSO and your partner uses the email PIN because they were never going to install an authenticator app for the thermostat graph, and that's a perfectly good outcome.
While You're In There: Lock the Cloudflare Account Itself
Worth sitting with for a second: that account now controls DNS for your domain, every tunnel route, and the policy deciding who reaches your services. It has become the master key to your entire HomeLab. If it's protected by a password you also used on a forum in 2014, all of the above is decoration.
Go to My Profile → Authentication and turn on two-factor authentication. You get two options and should take both:
- An authenticator app (TOTP) — Google Authenticator, Microsoft Authenticator, Aegis, 1Password, whatever you already use. Thirty-second rotating codes, works offline, takes about ninety seconds to set up.
- A security key (WebAuthn) — a YubiKey, or the authenticator already built into your laptop and phone: Touch ID, Windows Hello, Android fingerprint. This is the phishing-resistant one, because the key refuses to authenticate to a lookalike domain no matter how convincing the email was or how tired you are.
Enable both and Cloudflare prompts for the security key first, with TOTP as fallback for when the YubiKey is in your other jacket. Then download the backup codes and put them somewhere that isn't the laptop you'd be locked out of — the failure mode here is losing your phone and discovering that your recovery plan lived on it.
Two Gotchas Before You Turn It On
Access protects browsers, not robots. The moment you put Access in front of a hostname, anything automated hitting that URL gets an HTML login page instead of your API — including Uptime Kuma monitors pointed at your own services, webhooks, and mobile apps. The symptom is comedic: your monitoring stack starts reporting everything as down, because from its perspective the entire internet is now asking it to log in. The fix is a service token, or an Allow policy matching that specific client, or simply not putting Access in front of endpoints that machines need to call.
Corporate mail scanners eat one-time PINs. Some email security tools follow every link and code in an incoming message to check it for malware. Since the PIN is single-use, the scanner spends it, and by the time you paste the code it's already been redeemed — by your own employer's security software, which is at least a defensible reason to be locked out.
Keep your app's own login enabled underneath all this. Access is a gate at the property line, not a replacement for a lock on the door, and layers are the whole idea.
Common Gotchas
Everything above works. Here's what stood between me and it working.
Containers Can't See Each Other by Default
The overwhelming majority of "my tunnel doesn't work" is really "these two containers aren't on the same network." Docker only resolves container names within a shared user-defined network — the compose file above handles it, but the moment you want to expose something from a different stack, you have to introduce them:
docker network connect homelab some-existing-containerOr, in that stack's compose file, declare homelab as external: true. Either way, container names only resolve on networks they're both attached to, and nginx will report the upstream as simply not existing.
The Free Tier Is More Generous Than the Rumours
Cloudflare Tunnel is free, and it is not metered by the gigabyte — you won't find a bandwidth counter, because there isn't one. The Zero Trust free plan covers up to 50 users and 50 Access applications, numbers a HomeLab will never approach unless something has gone unusual.
The real limit is a terms-of-service one rather than a quota: Cloudflare's CDN terms restrict using the network to serve large volumes of video and other big files hosted outside Cloudflare's own storage products. Nobody is going to send you a letter for a monitoring dashboard and a code editor. Piping your entire Jellyfin library through the tunnel to relatives on three continents is a different conversation, and one people do occasionally get invited to have.
You Don't Need Your Own Certificates
Cloudflare issues and renews the public certificate automatically. No certbot, no renewal cron, no 3am expiry outage — which, coming from maintaining Let's Encrypt renewals by hand, still feels like getting away with something.
Leave the SSL/TLS encryption mode on Full and don't touch it. Flexible is the one that bites: it makes Cloudflare talk plain HTTP to the origin while telling the browser everything is encrypted, which combined with the X-Forwarded-Proto issue above produces redirect loops that look supernatural. The tunnel itself is encrypted regardless, so HTTP between cloudflared and nginx inside your Docker bridge is fine.
Don't Publish Anything That Doesn't Have a Login
The tunnel doesn't care what it's publishing. The instant that hostname resolves, your service is on the public internet, indexed by whatever crawls it, probed by everything that probes everything. Uptime Kuma prompts you to create an admin account on first run — do that before adding the public hostname, not after. An unclaimed Kuma instance hands administrator rights to whoever fills in the setup form first, and there is no rule saying that has to be you. Nothing quite like watching a service you own get set up by someone in another hemisphere with better reflexes.
Security Considerations
Tunnel is a genuine improvement over port forwarding. It is not a force field.
What it does handle
- IP exposure — your home address never appears in public DNS
- Volumetric DDoS — absorbed at the edge, thousands of kilometres from your router
- Port scanning — there is nothing open to find
- Background noise — the constant automated probing that any open port attracts never reaches you
What it doesn't
- Application vulnerabilities — a flaw in the app you published is still a flaw, now with a global audience and a nice certificate
- Weak or reused credentials — Cloudflare will faithfully deliver the attacker's correct password
- Services with no authentication — publishing one is publishing it, full stop
- You — the tunnel does exactly what you configure, including the parts you configured at midnight
The second list is why Step 6 exists. Access shrinks it — a vulnerability in Uptime Kuma stops being interesting when unauthenticated strangers can't reach Uptime Kuma — but it doesn't empty it, because a determined attacker who gets through your identity provider inherits everything behind it.
So: strong unique passwords on everything you publish, 2FA on the Cloudflare account, Access in front of anything that doesn't need to be public, and a periodic look at your list of published hostnames to remove the thing you exposed for ten minutes in March to test something and have thought about zero times since. That one's the real risk. It's always that one.
Summary
- Cloudflare Tunnel opens an outbound QUIC connection from your box to Cloudflare's edge — no port forwarding, no router access, no public IP, nothing to scan
- Pick your tunnel type deliberately — remotely-managed uses a token, locally-managed uses a credentials file and a config.yml, and mixing them up is the classic time sink
- Nginx behind the connector turns one tunnel route into unlimited services, routed by hostname in a file you control
- Set
X-Forwarded-Proto httpsexplicitly —$schemeis wrong here and the symptom is a redirect loop that explains nothing - The compose file has no published ports, which is the entire thesis in one detail
- Cloudflare Access is free and takes five minutes — an emailed one-time PIN, or SSO that inherits the authenticator app and passkey you already use
- Turn on 2FA for the Cloudflare account itself — it now holds the keys to everything, and backup codes stored on the device you'd be locked out of are not a plan
The result: services reachable from anywhere in the world, gated by identity, with zero inbound exposure of your home network. Your router doesn't know they exist. Your ISP's port blocking is irrelevant. Shodan has nothing to index, and the bots that spent last year politely trying admin/admin against your old forwarded port will have to find someone else.
Happy Coding!!!