
Cut LLM Costs: Access Your Home Ollama from the Cloud via Twingate

Running LLMs in the cloud can burn a hole in your wallet faster than a bad crypto investment. Costs are steep, and every token adds up. My workaround? I run Ollama on my PC at home and connect my cloud Linux VM to it using Twingate.
That way, I get the best of both worlds: cloud accessibility with local compute. The only thing I pay for is electricity… and since I live in California, that’s almost as expensive as paying for GPT-4. 🔌💸
What We’ll Build
We’ll deploy a Connector inside your local network, define your home PC as a Twingate Resource, and run the headless client on your cloud Linux server using a Service Account. The result: a secure, outbound-only tunnel from cloud → home/office LAN.
[ Cloud Linux VM ]
    └─ Twingate Client (headless, service account)
            ⇅ Secure Tunnel
[ Twingate Controller/Relays ]
            ⇅ Secure Tunnel
[ Home PC ]
    └─ Twingate Connector (Docker Compose)
          └─ Ollama / Local Apps
Step 1 — Connector on Your PC (Docker Compose)
On your home PC (or a small always-on machine in your LAN), run the Twingate Connector via Docker Compose:
services:
  twingate_connector:
    image: twingate/connector:latest
    container_name: connector-homelab
    restart: always
    network_mode: host
    sysctls:
      net.ipv4.ping_group_range: "0 2147483647"
    environment:
      - TWINGATE_NETWORK=<TENANT_NAME>
      - TWINGATE_ACCESS_TOKEN=<ACCESS_TOKEN>
      - TWINGATE_REFRESH_TOKEN=<REFRESH_TOKEN>
      - TWINGATE_LOG_LEVEL=3
      - TZ=America/Los_Angeles
Bring it up:
docker compose up -d
Step 2 — Define Your Local PC as a Resource
In the Twingate Admin Console, create a Resource for your PC:
- Address:
192.168.1.50(static IP recommended, more on that later) - Remote Network: the one tied to your Connector
- Ports: optionally restrict to
22(SSH),3389(RDP), etc.
Step 3 — Service Account & Key
Create a Service Account, assign it to a group with access only to your Resource, and generate a Service Key. Save it as service_key.json on your cloud VM.
Step 4 — Headless Client on the Cloud Linux VM
Install the client directly (no Docker needed here):
curl -s https://binaries.twingate.com/client/linux/install.sh | sudo bash
sudo twingate setup --headless ./service_key.json
sudo twingate start
twingate status
Now your cloud VM has a zero-trust tunnel into your home PC.
Step 5 — Test with Ollama
From your cloud Linux VM:
curl http://192.168.1.50:11434/api/generate -d '{
  "model": "llama3.1:8b",
  "prompt": "Explain zero-trust networking in simple terms."
}'
This routes through Twingate to your local PC running Ollama. Congrats — you’ve just saved yourself a fat LLM bill.
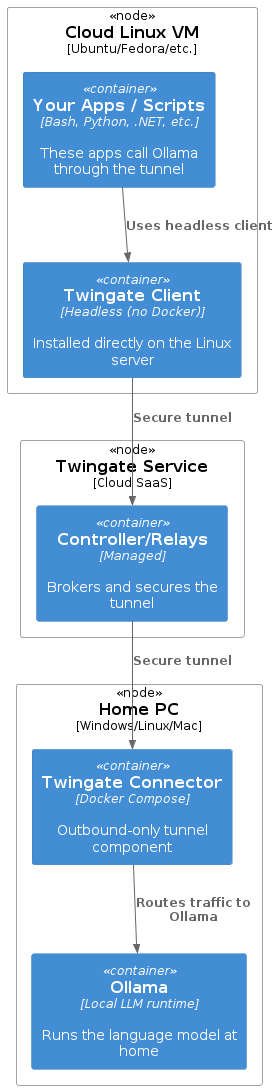
Deployment Diagram
Here’s a PlantUML deployment diagram to visualize what runs where:
@startuml
!include <C4/C4_Deployment>

Deployment_Node(pc, "Home PC", "Windows/Linux/Mac") {
    Container(connector, "Twingate Connector", "Docker Compose", "Outbound-only tunnel component")
    Container(ollama, "Ollama", "Local LLM runtime", "Runs the language model at home")
}

Deployment_Node(cloud, "Cloud Linux VM", "Ubuntu/Fedora/etc.") {
    Container(client, "Twingate Client", "Headless (no Docker)", "Installed directly on the Linux server")
    Container(app, "Your Apps / Scripts", "Bash, Python, .NET, etc.", "These apps call Ollama through the tunnel")
}

Deployment_Node(tg, "Twingate Service", "Cloud SaaS") {
    Container(controller, "Controller/Relays", "Managed", "Brokers and secures the tunnel")
}

Rel(app, client, "Uses headless client")
Rel(client, controller, "Secure tunnel")
Rel(controller, connector, "Secure tunnel")
Rel(connector, ollama, "Routes traffic to Ollama")
@enduml
Troubleshooting
Even with Twingate, there are a few “gotchas†I ran into:
- Authentication required
On my cloud Linux box, I needed to explicitly authenticate with the Resource name:
sudo twingate auth pcname
- Connector not starting
Double-check your Docker Compose environment variables. Typos = instant pain. - DNS quirks
Resources resolve from the Connector’s perspective. If DNS fails, use a static IP instead. - Static IP = sanity saver
Assign your PC a static IP in your router. That way, even if your DNS or Pi-hole blocks everything (yes, that happened to me 😅), the tunnel still works. - Firewall rules
Make sure outbound TCP443,30000–31000, and UDP/QUIC are allowed. - Tighter security (optional)
In the Twingate Admin Console, you can:Whitelist IPs (only specific networks can connect).Set authorization expiration (forcing periodic re-auth).
These controls add extra guardrails if you’re sharing access or just want stricter hygiene.
Why I’m Using Twingate with Ollama at Home
LLM APIs are fantastic, but costs scale quickly if you’re experimenting or automating heavily. By tunneling into my home PC with Twingate, I can offload inference to my own Ollama instance.
This setup means:
- My cloud VM calls Ollama like any other microservice.
- My home PC stays hidden behind outbound-only tunnels.
- I avoid monthly LLM bills (electricity is my only cost — and in California, that might actually be worse 😅).
Happy Coding!!!